
If you’re searching for the best audio interface guide, you’re likely trying to cut through the noise—figuring out which interface actually fits your setup, your sound, and your workflow. With so many options promising pristine audio and “studio-quality” results, it’s hard to know what truly matters: preamp quality, latency performance, connectivity, driver stability, or long-term scalability.
This guide is built to answer those exact questions. We break down what an audio interface really does, which specs impact your recordings, and how to match the right device to your needs—whether you’re producing music, streaming, podcasting, or building a hybrid studio setup.
To ensure accuracy, we analyzed current hardware specifications, compared real-world performance benchmarks, and reviewed integration capabilities across major DAWs and operating systems. The result is a practical, no-fluff roadmap to help you choose confidently—and avoid expensive mistakes.
Decoding the Core: Inputs, Outputs, and Preamps
If you get nothing else right when choosing an audio interface, get the I/O right. Inputs and outputs (I/O) simply describe how many signals your interface can receive and send. A solo vocalist with one microphone? You might need just one or two inputs. Recording a full drum kit with multiple mics? You could need eight or more—fast. I’ve seen too many people buy “just enough” and regret it within a month (gear envy is real).
Input Types Explained
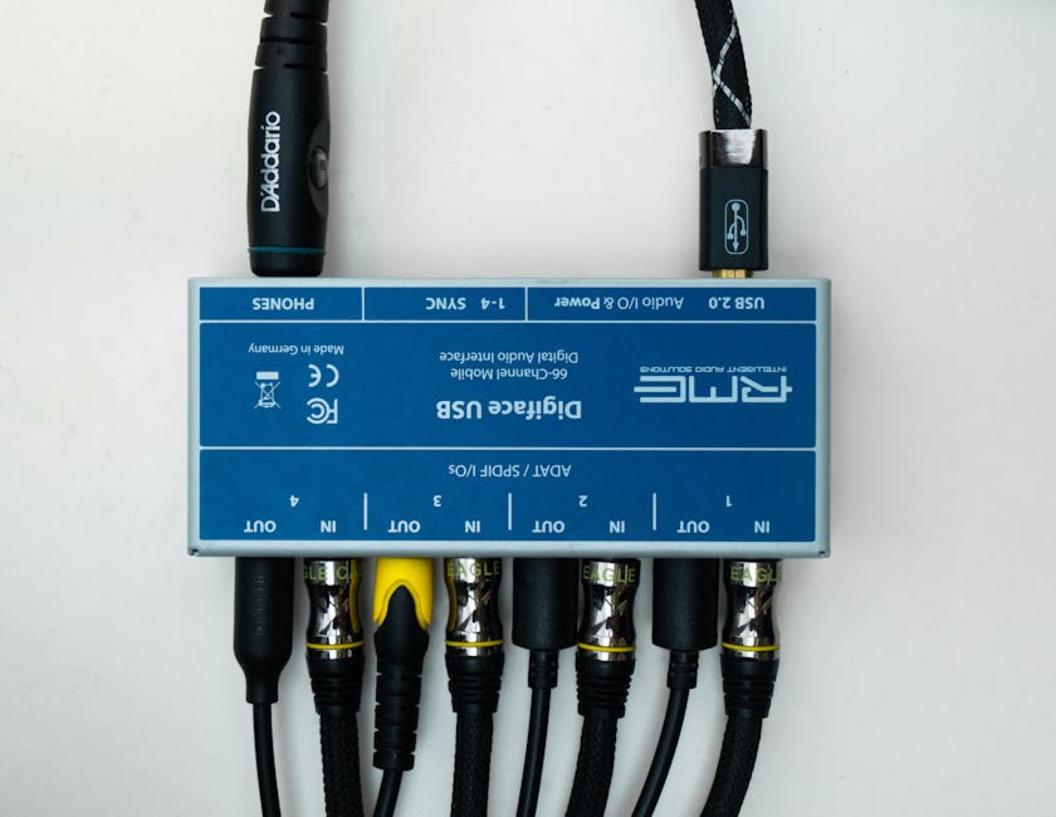
Most interfaces use Mic/Line combo inputs (XLR/TRS). XLR is the three‑pin connector for microphones. TRS (Tip‑Ring‑Sleeve) handles balanced line-level signals like keyboards. Then there’s Instrument (Hi‑Z) input—”high impedance”—designed for guitars and basses. Plugging a guitar into a standard line input can sound thin; Hi‑Z preserves tone and dynamics.
Digital inputs like ADAT and S/PDIF let you expand your setup. ADAT (Alesis Digital Audio Tape format) can add up to eight extra channels over optical cable at 44.1/48kHz (Avid, Focusrite documentation). S/PDIF carries stereo digital audio. Pro tip: expansion ports are future-proofing gold.
The Power of Preamps
A preamplifier boosts a microphone’s tiny signal to usable level. Some preamps are clean and transparent—great for podcasts or clinical clarity. Others add “color,” subtle harmonic distortion that shapes tone (think vintage warmth). Personally, I prefer clean preamps and add character later in software. It’s more flexible (and less permanent).
Phantom Power (+48V)
Phantom power supplies 48 volts to condenser microphones, which require external power to operate (Shure). Make sure enough inputs offer +48V—or your condenser won’t work at all.
If you’re serious about choosing wisely, this best audio interface guide mindset—thinking ahead about inputs, expansion, and power—will save you money and headaches.
The Language of Quality: Sample Rate, Bit Depth, and Latency
If audio quality had a vocabulary, sample rate, bit depth, and latency would be its core verbs.
Sample rate (measured in kHz) is how many times per second your audio is captured. Think of it like frames per second in video. At 48kHz, your interface takes 48,000 “snapshots” every second. That’s why 24-bit/48kHz is considered a professional standard for music, film, and streaming. Higher rates like 96kHz or 192kHz offer more flexibility in post-production—especially for extreme pitch-shifting or sound design—but for most users, the returns diminish fast (and your CPU will definitely notice).
Bit depth determines dynamic range—the difference between the quietest and loudest sounds a system can capture. A 16-bit recording offers about 96 dB of dynamic range, while 24-bit extends that to roughly 144 dB (theoretical maximum, per the Audio Engineering Society). In practical terms, 24-bit recording prevents unwanted noise and preserves subtle details like breath, reverb tails, or finger movement on strings.
Then there’s latency—the tiny delay between playing a note and hearing it back. It’s influenced by:
- Buffer size (smaller = lower latency, higher CPU load)
- Driver quality (ASIO and Core Audio are optimized examples)
- Connection type (USB-C and Thunderbolt typically outperform older standards)
The fix? Direct monitoring. This feature routes your input straight to your headphones before it hits the computer, delivering a zero-latency signal. For performers, it’s non-negotiable.
Looking ahead, speculation alert: as AI-powered DSP becomes standard, future interfaces may auto-adjust buffer sizes in real time. Until then, consult a best audio interface guide and prioritize 24-bit depth—it’s the safest long-term bet.
Bridging the Gap: Connectivity and System Integration
Choosing between USB 2.0/3.0 and Thunderbolt isn’t just about ports—it’s about bandwidth and latency (the delay between input and output). USB 2.0 supports up to 480 Mbps, while USB 3.0 jumps to 5 Gbps. Thunderbolt 3/4? Up to 40 Gbps, according to Intel’s published specs. That difference matters when running high track counts at 96kHz or higher.
Some argue USB is “too slow” for professional work. The data says otherwise. Many modern USB 3.0 interfaces handle 32+ channels reliably in home studios. But in large commercial sessions—think 100+ tracks with virtual instruments—Thunderbolt’s lower round-trip latency (often under 5ms in benchmark tests) offers measurable stability.
The Rise of USB-C
Here’s the confusion: USB-C is a connector type, not a speed standard. A USB-C port might support:
- USB 3.1 (10 Gbps)
- Thunderbolt 3 or 4 (40 Gbps)
Check your device specs or look for the lightning bolt icon near the port (pro tip: never assume based on shape alone).
Device Integration Hacks
Driver stability directly impacts performance. Outdated drivers on Windows or macOS are a top cause of audio dropouts, according to multiple DAW support forums and manufacturer advisories.
Class-compliant interfaces simplify mobile setups, enabling plug-and-play with iOS/iPadOS—no driver installation required.
And remember: even the best audio interface guide won’t help if your system integration is sloppy (yes, cables matter).
For video creators, seamless integration pairs beautifully with strong visuals—see lighting techniques for studio grade video production.
Beyond the Basics: Features for the Modern Creator
Modern interfaces do more than record—they upgrade your entire workflow.
Onboard DSP (Digital Signal Processing)—dedicated chips inside your interface that run effects like reverb, EQ (tone shaping), and compression (volume control)—lets you monitor with zero latency while freeing your computer’s CPU. Translation: smoother sessions, fewer crashes, happier creativity.
Loopback functionality blends computer audio with live inputs, perfect for streamers and educators who need seamless system sound capture (no messy workarounds).
MIDI I/O still matters. It connects synths and drum machines directly—no extra gear required.
• Lower latency
• Cleaner routing
• Pro flexibility
For deeper comparisons, check a best audio interface guide.
Take Control of Your Sound Today
You came here looking for clarity on choosing the right setup—and now you have it. From understanding preamps and latency to matching features with your recording goals, you’re equipped to make a confident decision. No more second-guessing specs or wasting money on gear that doesn’t fit your workflow.
The frustration of muddy recordings, compatibility issues, and endless comparison tabs ends here. With the insights from this best audio interface guide, you can cut through the noise and focus on what really matters: creating studio-quality sound with ease.
Now it’s time to act. Choose the interface that aligns with your setup, implement the integration tips you’ve learned, and upgrade your signal chain today. Thousands of creators are already transforming their sound with smarter tech choices—don’t stay stuck with subpar audio.
Ready for cleaner recordings and seamless device integration? Apply what you’ve learned, lock in the right gear, and start producing at a professional level now.